
Modeling for 3D printing
Modeling for 3D printing is different from creating models for rendering or animation. There are some basic rules that must be followed to ensure the model is suitable for production.
Many of the most widely used software programs were designed for rendering, not 3D printing. They can therefore generate objects that appear perfect at first glance, but whose geometries contain errors. One cause can be the use of Boolean operations between two or more spherical objects, sometimes simply due to the use of inappropriate modeling methods.
In particular, these simple precautions must be taken into account:
Volume
All objects must have a volume. Often drawing for renderings or animations we create surfaces without any thickness: with 3D printing we will create a solid object, real, which must therefore have a thickness, even minimal.
To give volume to surfaces, simply extrude them to obtain solids.
Closed objects
Objects must be closed. Closed means to "tight seal" (watertight). If we imagine printing the object, we must imagine it as if its volumes were solid, connected to each other.
Manifoldo!
Objects must be manifolds: in short it means that the geometries must have a inside it's a out without “holes”. A mesh is said non-manifold when it has edges shared between more than two faces.
Errors can concern:
– faces enclosed in a volume
– double points
– edges
– separate volumes joined by an edge or a point
Each corner must have only two adjacent faces, no more and no less.
Points must belong to a single face. When two faces share a point, without having a common edge, then the point is non-manifold.
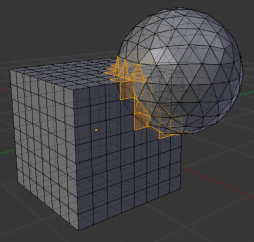
Blender has a function to identify and correct edges and points non-manifold:
select an object (left click) and go to Edit mode (Tab). All points are selected, you need to deselect them all by pressing Alt+A.
Click on Select → All by Trait → Non Manifold or use the shortcut Shift + Ctrl + Alt + M
All points will be selected non-manifold that need to be corrected.
Note: The tool is also available from Blender 4.x Make Manifold in the 3D Print Toolbox, which automatically corrects the most common problems (inverted normals, holes, empty edges). Let's talk about it further on in the guide.
normal
All surfaces of your model must have the normals oriented in the right direction.
If your model contains normal inverted it can not be printed, because it is impossible to determine which is the "inside" and which the "outside" of the model.
Attention to the dimensions
You have to consider the maximum dimensions of your object, base, height, depth and their sum, x + y + z.
Each material has a different maximum printable size, for some materials there is also a minimum size.
Measure the thickness of the walls of your object: if the dimensions are lower than those guaranteed for the chosen material, your object could be very fragile or even break in production.
You can find this information in the sheet Technical details on the page of each 3D printing material.
Check and correct your design with Blender
The 3D Print Toolbox is a Blender extension with a set of tools specifically designed for 3D printing. In recent versions, it has been enhanced with new tools such as Make Manifold, Hollow, and Bisect.
How to install and activate the 3D Print Toolbox
Starting with Blender 4.2, the extension management system has changed. The 3D Print Toolbox is no longer a pre-installed add-on that requires a checkbox to activate, but must be downloaded from the Extensions platform.
Here's how:
1. Open Blender and go to the menu Edit → Preferences
2. Select the tab Get Extensions
3. Search for “3D Print Toolbox” in the search bar
4. Click on Install to download and activate the extension
Alternatively you can visit the page extensions.blender.org/add-ons/print3d-toolbox and drag the file directly into the Blender window.
Once installed, the 3D Print Toolbox panel will be available in the 3D view sidebar (button N) in the dedicated tab.
Mesh information
Volume:
Calculates the volume of the mesh, including applied transformations.
The volume is given in cm³. The measurement works if the normals are oriented correctly and if the meshes are manifolds.
Area:
Calculate the total area of all faces, reporting it in cm².
Check the model
We have to work in Edit mode:
Solid
Check that the mesh has an inside / outside (ie it is manifolds), and that the joined faces are not oriented in opposite directions. This is the main and most important control, also because the other tools will need a mesh manifolds to work.
Intersections
Is able to identify faces that cross other faces in the mesh (self-intersecting mesh).
In some cases the intersections of geometries can be printable, but in general it is better to avoid them.
degenerate
Identifies the edges with a length of 0 and faces with an area equal to 0, compared to a parameter that can be modified. Unfortunately it does not always work, it depends on the tools used to generate the mesh.
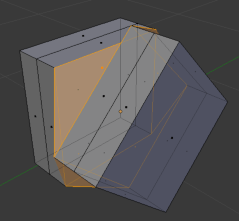
Distorted Faces
Reports non-flat faces, which can be printed with an undefined pattern.
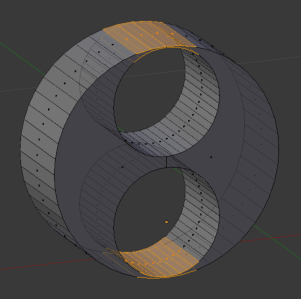
Thickness
Check the thickness of the walls, ie the thickness of a surface that can be printed. Different materials have different minimums for the thickness of the walls: check the board Technical details on the page of each material and check your design according to the parameter shown.
Sharpness
Somehow similar to Thickness: excessively pointed areas can generate parts that are too thin to be produced.
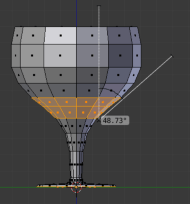
overhang
Identify undercuts. 45° is a near-default value. For some materials, it may be helpful to check which elements have this problem and consider adding supports.
Shells
Counts the number of separate mesh "islands" within a single object. This is useful for verifying that the model doesn't contain disconnected parts that could cause problems when printing.
Re-scales
This command is very useful for modifying the scale of objects that are not required to have fixed dimensions, for example to make them conform to the dimensions required by the material chosen for printing.
Choosing Volume You can scale the object (or selected objects) up to a set volume. Alternatively, Scale to Bounds allows you to scale the model so that the largest dimension matches a specified value.
The maximum printable volume varies according to the selected material and is indicated in the sheet Technical details of every material.
We can not indicate the unit of measure when we set the volume we want to obtain, so it is important to set the measurement units of the scene in metric or imperial system before entering the desired value, so as to decide whether it is cubic centimeters or cubic inches.
Export
From here it is possible to export the file simply by selecting a format from the drop-down menu.
Detailed information on exporting is provided in the next section of this guide.
New tools: Make Manifold, Hollow, and Bisect
The latest versions of the 3D Print Toolbox (v1.2 and above) introduce very useful tools that simplify the preparation of models for 3D printing:
Make Manifold
Automatically fixes the most common problems that make a mesh non-manifold: inverted normals, holes in geometry, edges, and empty faces. It's the fastest way to make a model print-ready with just one click.
This tool is particularly useful for correcting AI-generated models, which often contain geometry errors. Read our A guide on how to 3D print AI-generated models.
Hollow
It allows you to hollow out a solid model, creating a uniform wall thickness. This is very useful for 3D printing because it reduces the amount of material used (and therefore costs) while maintaining the model's external shape. It is applied as a modifier, allowing you to adjust the thickness before applying it permanently.
Bisect
Slices the object along a plane. Useful for dividing overly large models into separate printable parts, or for creating flat sections that adhere better to the print bed.
Alignment to the print bed
Allows you to rotate the model by aligning a selected face to the print plane (Z-axis). Choosing the right orientation is essential to minimize supports and achieve the best surface quality.
Export in STL format
Step 1: Remove all unnecessary vertices.
Select the objects and enter Edit mode (button Tab). Select all vertices by pressing the key TO, then go to Mesh → Clean Up → Merge by Distance.
This command (called “Remove Doubles” in older versions of Blender) unifies all duplicate vertices that are overlapping each other.
You can change the distance at which vertices will be joined in the options panel that appears at the bottom left after running the command (or by pressing F9 to reopen it).
Step 2: Check the triangulation
By exporting the meshes in STL, Blender will triangulate. Many times this can create problems with smooth surfaces or model curves. To get a preview, select all vertices and press Ctrl+T.
Step 3: recalculate the normals
Select all vertices in Edit mode (Tab), then go to Mesh → Normals → Recalculate Outside (or use the shortcut Shift+N).
Step 4: select the objects to export
Blender will export only the selected objects in the STL file, so make sure that in Object Mode they are highlighted.
Step 5: Export the file
Select File → Export → STL and save your file.
Note: In newer versions of Blender, it is also possible to export directly from the 3D Print Toolbox Export panel, which offers quick access to STL, OBJ, and PLY formats.
Export to OBJ format
By exporting the drawing in .OBJ we can access advanced options, for example whether or not to include normals and whether to resort to triangulation, but also to choose to also include the material file in format .mtl. To order a 3D printed model containing textures, colors and materials you need to create a .zip archive containing the .obj and .mtl file.
For a detailed guide on how to prepare colored models for 3D printing, see our A guide to color 3D printing with Blender.
Reduce the weight of the file
If the file is too heavy, one way to make it lighter is to reduce the number of faces in the model.
Import the model into Blender, select it (left click) and go to the panel Properties (wrench icon in the right sidebar).
Click on Add Modifier and select Decimate:
Choose a ratio for the reduction (1 = original number of polygons, 0.5 = half the original polygons, etc.)
If the command does not work it is possible that there are errors in the geometries, so it is a further check to check the model and fix it.
Frequently asked questions
Is Blender suitable for 3D printing?
Yes. Blender is a free and open source software that, thanks to the 3D Print Toolbox, offers all the tools needed to check and prepare models for 3D printing: geometry check manifolds, wall thickness verification, normal recalculation and export to STL and OBJ formats.
How do I export an STL file from Blender?
In Object mode, select the objects to export, then go to File → Export → STL. Before exporting it is advisable to clean the mesh with Mesh → Clean Up → Merge by Distance and recalculate the normals with Shift+N. The complete procedure is described in the dedicated section of this guide.
How do you fix a non-manifold model in Blender?
You can identify the elements non-manifold in Edit Mode with Select → All by Trait → Non Manifold (shortcut Shift + Ctrl + Alt + M). For automatic correction, use the tool Make Manifold of the 3D Print Toolbox, which solves the most common problems with one click.
What is the 3D Print Toolbox and how do I install it?
The 3D Print Toolbox is an official extension for Blender that provides specific tools for 3D printing: mesh analysis, thickness control, verification overhangs and quick export. From Blender 4.2 it is installed via Edit → Preferences → Get Extensions, searching for “3D Print Toolbox” and clicking Install. Detailed instructions in the dedicated section.
How do I reduce the weight of an STL file that is too large?
Use the modifier Decimate in Blender: go to the Properties panel, click on Add Modifier → Decimate and adjust the reduction ratio. A value of 0.5 halves the polygon count. This reduces the file size while maintaining the overall shape of the model.
What is the minimum wall thickness for 3D printing?
The minimum thickness varies depending on the material chosen. For example, for white SLS plastic (nylon), the minimum is generally around 0.8 mm, while for high-definition resin, lower thicknesses can be achieved. See the data sheet. Technical details on the page of each material for exact values.
What is the difference between the STL and OBJ formats for 3D printing?
The format STL contains only the model geometry and is the most used for monochrome 3D printing. The format OBJ It can also include information about materials, colors and textures via the file .mtl associated, and is necessary for the color 3D printing.
Can I 3D print an AI-generated model?
Yes, but AI-generated models are rarely ready for printing as-is. They almost always have issues such as non-closed meshes, non-manifold geometries, and excessively thin walls. The 3D Print Toolbox tools (especially Make Manifold) are ideal for correcting these errors. Read our Complete guide to AI and 3D printing.
Done! Now you can upload a file
or read the FAQ