Start your project
We recommend that you use our design templates to create your design.
After downloading the templates, open in Illustrator the format you prefer, as if it were a normal file. Make sure that File> Document Color Method be set as RGB, then start drawing.
You can design for laser cutting in one of three different material formats:

P1
useful size:
181 x 181 mm

P2
useful size:
384 x 384 mm

P3
useful size:
790 x 384 mm

P4
useful size:
790 x 790 mm

80×45
useful size:
800 x 450 mm
available only for
felt and cardboard
How to draw for the laser
The color used for the drawn lines determines what the laser will do, whether through-cutting or engraving.
The key part of your design is the shapes you will cut. The easiest way to visualize how this will turn into your design is to imagine laying out the pieces you would like to make on a sheet of paper, then tracing their outline on the sheet with a pencil. Your file should resemble that sheet with the lines drawn.
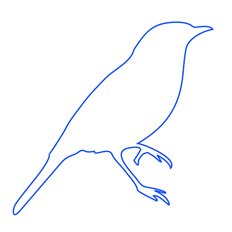
For example, if you're designing a little bird with a blue outline, the laser will cut a little bird ...
If you convert the same lines in red, the laser will engrave the bird on the chosen material, and so on.
It's that easy!
Now let's get to the details ...
Cutting lines
To get a cut line, draw a line or shape and set the color of the trace as blue (RGB with values 0, 0, 255):

Engraving of vector lines
The vector etching process is very similar to the cutting method, but instead of piercing the material, the laser only affects the surface.
The laser will move along the engraving lines in your design. You can set the design to make different types of engraving: light, medium and deep, each with a different intensity and therefore depth. All three engravings are drawn very precisely with very thin lines, about the same size as the laser beam.
Light vector engraving
Set the track color as magenta RGB with values 255, 0, 255:

Vector media engraving
Set the color of the track as RGB green with values 0, 255, 0:

Deep vector engraving
Set the track color as RGB red with values 255, 0, 0:

Engraving of raster fills
Generally the incisions of raster fills are used for areas with backgrounds.
We do not recommend engraving elements that are smaller than 0.5mm in raster mode: it will not lead to good results.
The scale of the raster engraving goes from the black that corresponds to the most marked incision, up to the very light gray that will make the engraving lighter (or white, which corresponds to the null incision). You can use any grayscale between the two extremes, but remember that the three RGB values must be equivalent. Make sure you use solid and spot colors and no patterns or textures.
To obtain a more defined border in an area engraved with a raster pattern, combine the black or gray fill with a track corresponding to a vector engraving.
Engraving of light raster fills
Set the fill color to light gray with the RGB values of 230, 230, 230:

Engraving of medium raster fills
Sets the fill color as gray with the RGB values of 128, 128, 128:

Engraving of deep raster fills
Sets the fill color as black with RGB values of 0, 0, 0:

To use the text
All the texts inserted in your drawing must be converted into outlines. In this way the laser will follow your drawing correctly, even without having the same installed font.
To transform the text into a contour, just choose Text (Type)> Create Outline (Create Outlines) from the top menu. Once you run this command, you will not be able to edit the text, so do this after checking the spelling!

You can create texts using fills for raster engravings, lines for vector engravings, or a combination of the two types of incisions.
To use images
Our making system takes into account only the drawings in vector, ignoring all the images inserted in other formats (like.jpg or .bmp).
If you want to insert a non-vector image in your file, you have to trace it in vector. No need to do it by hand! You can do this simply by clicking on the inserted picture and using the command Object> Live Trace> Tracing Options. You'll see numerous tracing options, so do several tests until you find the one that's right for you. Make sure your traced shapes are presented in a uniform, flat color.

Then you will have to use the command Object> Expand (Expand). If the tracing worked correctly, you should be able to see the vectors all around the individual parts of the traced image. You will also find a transparent rectangular shape as a contour of the traced image: select it with the "Direct Selection" tool (white arrow) and delete it.
Finally, to select the desired raster engraving level, select all the traced elements and set the fill color.
How to remove double lines
If you place two objects next to each other, in such a way as to match the ends, it is very likely that you get the overlap of the cutting lines.
The double lines are quite easy to spot at a glance, as they are presented in a darker blue than other cutting lines. These double lines must be eliminated in such a way as to obtain a single cutting line, or, better said, a shared cutting line; otherwise the laser will literally cut the same part twice (which is not ideal for the yield on the material, or for your estimate!).
To delete the double lines, select them with the "Direct selection" tool (white arrow), then press delete (backspace) once or twice. Another cut line will remain, identical but with a lighter blue than the previous one. Removing double lines means optimizing the design, in order of yield and lead times.
Export the file
Make sure that all clipping masks are exploded, then save your project in .AI format